Nuffnang Ads

Showing posts with label tutorials.. Show all posts

Monday, April 22

[TUTORIAL] How to Crop a T-Shirt.

Do you always get free t-shirts that is so oversized that it make you look like some horrible fat/short monster? No matter how nice the shirt is, you can only wear it as your pajamas? Well I do! And I hate the fact that I have so many nice shirts but they are all so big on me. Blame myself for not being confident and always choose the M size instead of S! :( 

So frustrated with it that I decided to crop my top! I think the outcome was pretty decent and presentable. A lot of my coursemates praised the crop top. So, I'd like to share it with my dear readers, yes you! :3

p/s : The cropped top below belong to my friend who asked for my favor to help crop her top. My top (black) was cropped with another friend.

A preview of how the outcome is.. :)

All you need is a big oversized t-shirt with a pair of (preferably super sharp) scissors.


Well, this is how the shirt look like initially, so pretty yet so boring. LOL
ignore my slipper.


Firstly, you wear the shirt and mark it 2 fingers' distance below your waist.
(you can go higher if you want to expose your belly)


As for the sleeves, measure around 2 inch from the armpit area and cut it upward and outward diagonally.
This will help to make the drop-shoulder effect.


Cut it upward and outward diagonally like this.


This is how it looks like after all the cutting up to this point.
Notice that the sleeves are not even. 
You cut trim it again if you want to but it doesn't really matter.


Now to the collar, cut around 2-3 inch downward from the center of the collar like in the picture above.
(you can go deeper if you wanna to show more cleavage chest lol)


Then, cut it upward according to the round neck all the way for both left and right.


This is how it looks like.


After that, cut a straight line across for the back.
(note that if you curve it, it might end up too loose later on)

And that's it for the sleeves and collar part. Stretch it a little so that your shirt will curve on its own to hide all the cut marks. You can stop here if you want a simple crop top. :))

Or if you wanna make it a little bit more hippie, see below! :)

From the bottom edge, cut tiny strips to make it into fringe.
Again, the length is up to you depending on whether you wanna expose your belly or not.
(you can put a cellophane tape across so that your fringe is of equal length)
(or if you're creative, you can do a high-low fringe)


NOTE : Never cut the front and back fringe together so that the fringe will appear more natural and messy instead of being so orderly front and back.


This is how it should look like after cutting.


Here comes the fun part. :3
Stretch the strips one by one to make it long and thin and more natural-looking.


Ta-daa! Post-stretch effect.


And here you go!
Cropped fringe top! :))


The fringe part.


How it looks like when worn.


The beauty of a cropped top lies on all the imperfect cut that you do!
So don't worry about the cuttings, all the stretching will cover it up :)
Try it and share a picture with me on Twitter or Instagram!
Happy trying! 

Xoxo.

Friday, February 15

[TUTORIAL] How to use Paypal for Malaysian Users

Recently, I bought something online and I was required to pay in another currency and the seller only accept payment via Paypal. With this, I have to get a Paypal account to make my payment. I was rather new and had some bad experience so I hope the future new users will not face any issue I faced.

It is not really that hard if you get it throroughly. :))


Firstly. you'll be led to this page once you sign up/sign in to your Paypal account. It will show you a overview of your account balance, previous transactions and all. 


You'll be required to sync one of your bank account/credit card to be the money source. To add your money source, click on Profile and choose your options.

I chose to ADD credit card.


There will be a limit for sending/withdrawal to your Paypal account until you confirmed your card.

Note : an amount of MYR10 will be deducted from your bank account/credit card for verification, but it will be refunded to your Paypal account instead of bank account once your account is verified.


Or you can choose to top up your Paypal account and send money with the credits in your Paypal account. Currently in Malaysia, only RHB has the option of topping up your Paypal account.

If you have a RHB bank account, you can consider this option. (provided you have internet banking)


in RHB, you can choose to send the money to your Paypal account in MYR or USD.
For every top-up in MYR, you'll be charged MYR1.
For every top-up in USD, you'll be charged MYR8.

Note : if you're sending money to a foreign account (non-Malaysian), you'll have to make sure your Paypal account's credit is in USD because MYR is a restricted currency in Paypal and its only available for transaction with Malaysian Paypal accounts.


If you decided that the balance in your Paypal account is too much, you can choose to withdraw it to your bank account too with certain charges with certain amounts.
(refer the table)


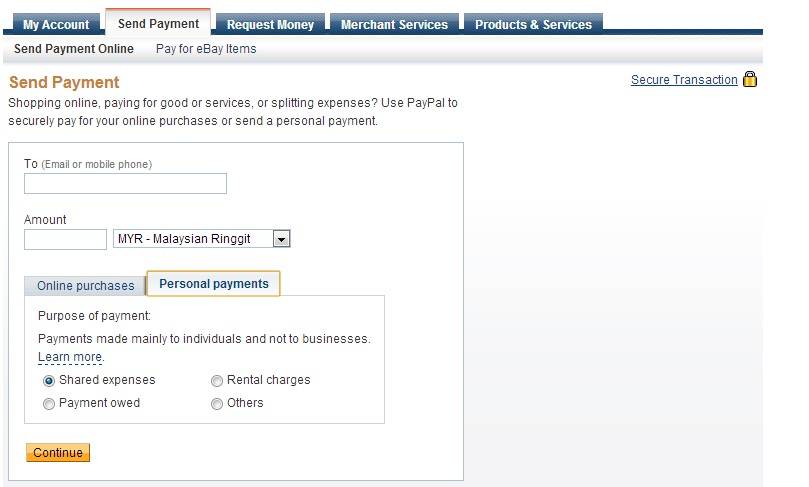
For payment, make sure the email address you put is the correct email as Paypal is not in the shoe to refund you your money if you send it to the wrong account.


Note that if you're sending money in foreign currency, they'll update you the exchange rate in your own currency to let you know how much you're actually paying.


Lastly, they'll confirm with you your payment method before sending your payment. 

Once your payment is sent, it cannot be undone! So make sure you check you details properly. Paypal has a fee charged when you use your credit card to make payment and the amount varies with the amount of money you send.

But its free is you pay with your Paypal account's balance. But make sure the credit in your Paypal is in USD if you're sending the money to a foreign account.

Hope this helps. :))